
Installing Zephyr RTOS on Windows
Zephyr RTOS, part 3. How to set up a Zephyr development environment on Windows without WSL: the host tools, a west workspace, the Zephyr SDK, and a first build to prove it works.
Part 2 described the pieces. This part installs them on a Windows PC. The steps follow Zephyr's official Getting Started guide, with the details I learned doing it on my own machine. All commands are for PowerShell, and this post covers Windows only.
Before you start
Windows 10 or 11 with winget, Windows' package manager. It is preinstalled on current versions; type
wingetin a terminal to check.Windows Terminal from the Microsoft Store is the recommended terminal.
Disk space and a decent connection. The Zephyr repository alone brings about 1 GB of Git history,
west updatethen fetches 66 more repositories, and the toolchains for every architecture add several gigabytes.A regular user terminal, not one opened as Administrator.
About the commands below. Every PowerShell block can be pasted and run as it is, with two exceptions: values written in angle brackets, such as <your-board-name>, and the two variables at the top of the manual SDK block in step 4. Those are the only things you edit.
Step 1: Install the host tools
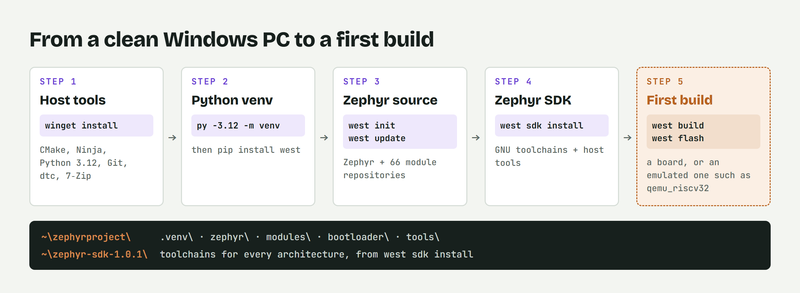
winget install Kitware.CMake Ninja-build.Ninja oss-winget.gperf Python.Python.3.12 Git.Git oss-winget.dtc wget 7zip.7zip
This installs CMake and Ninja (the build tools from part 2), Python 3.12, Git, the devicetree compiler (dtc) and a few helpers. Then close the terminal and open a new one, so it picks up the new PATH.
Use Python 3.12. Zephyr needs at least 3.12, and the official guide strongly recommends exactly that version: newer releases may fail on Windows when installing Zephyr's Python packages.
My trap: the Python installer and PATH. When I installed Python 3.12, its installer put itself at the front of my user PATH, which changes the Python that every other program on the PC finds. Zephyr does not need that: the next step creates a virtual environment through the py launcher, and everything else runs inside it. I removed the entry again.
Step 2: Create a workspace and a Python virtual environment
cd ~
py -3.12 -m venv zephyrproject\.venv
Set-ExecutionPolicy -ExecutionPolicy RemoteSigned -Scope CurrentUser
zephyrproject\.venv\Scripts\Activate.ps1
pip install west
zephyrprojectis the workspace folder. The virtual environment inside it keeps Zephyr's Python packages away from the rest of your system.Set-ExecutionPolicyis needed once: PowerShell refuses to run scripts such asActivate.ps1until you allow them for your user.While the environment is active, the prompt starts with
(.venv).westis Zephyr's meta-tool from part 2. From here on, it does most of the work.
Use cd ~, not $Env:HOMEPATH. The official guide uses cd $Env:HOMEPATH. That variable has no drive letter (\Users\you), so when a terminal starts on another drive, as mine often does on E: where my projects live, it points to a folder that does not exist. ~ always means your home folder.
Step 3: Get Zephyr and its modules
west init -m https://github.com/zephyrproject-rtos/zephyr zephyrproject
cd zephyrproject
west update
python -m pip install @((west packages pip) -split ' ')
west zephyr-export
west initclones the Zephyr repository intozephyrproject\zephyr. Itswest.ymlfile, the manifest, lists every module and the exact version of each.west updatefetches those modules: 66 repositories with the default settings, mostly vendor HALs and libraries. This is the longest wait of the whole install. If disk space is tight, the official guide points to west's manifest groups for skipping modules you do not need.west packages pipprints the Python packages that this Zephyr version and its modules need, and the PowerShell line hands that list topip. It may upgrade or downgrade west itself, which is expected.west zephyr-exportregisters this copy of Zephyr with CMake, so builds find it on their own.
This installs the development branch, main. For the latest stable release instead, add --mr and a release tag to west init, for example --mr v4.4.2, the latest release at the time of writing.
Step 4: Install the Zephyr SDK
$env:Path += ';C:\Program Files\7-Zip'
cd ~\zephyrproject\zephyr
west sdk install
The SDK holds a GNU cross-compiler for each architecture Zephyr supports, plus host tools. west sdk install reads the SDK version this Zephyr expects from its SDK_VERSION file (1.0.1 for mine), downloads the SDK from GitHub, checks its SHA-256, unpacks it into your home folder (C:\Users\you\zephyr-sdk-1.0.1), and runs its setup.cmd, which downloads the toolchains and registers the SDK with CMake.
7-Zip must be on PATH. Both the unpacking step and
setup.cmdcall7z. On my PC, 7-Zip sat inC:\Program Files\7-Zipbut was not onPATH, and the official guide warns about this too. The first line above fixes it for the current terminal, which is enough, because 7-Zip is only needed during the install. If you installed 7-Zip somewhere else, use that path instead.Save space with
-t. Without options, the installer fetches the toolchains for every architecture, which its own help describes as several gigabytes. If you know your chip, install only its toolchain, for examplewest sdk install -t arm-zephyr-eabifor 32-bit Arm boards such as the nRF52840 DK, or-t riscv64-zephyr-elffor RISC-V.My trap: HTTP 504. On my PC,
west sdk installfailed twice with an HTTP 504 from GitHub's release-download endpoint, a server-side timeout. The same files came down without trouble through GitHub's REST asset API, so I installed the SDK by hand, as described next.
Installing the SDK by hand
west sdk install fetches two archives from the SDK release: the minimal bundle, which becomes the SDK folder itself, and one archive per GNU toolchain. You can fetch them yourself and let the SDK's own setup script do the rest. For version 1.0.1, they are about 100 MB and 75 MB.
Start by setting these two values for your case. Everything after them runs as it is, in a terminal that has 7-Zip on PATH as shown above:
$ver = '1.0.1'                  # the version west sdk install asked for
$toolchain = 'arm-zephyr-eabi'  # the toolchain your board needs
1. Look up the two Windows files on that release:
$api = 'https://api.github.com/repos/zephyrproject-rtos/sdk-ng/releases'
$assets = (Invoke-RestMethod "$api/tags/v$ver").assets |
    Where-Object name -match "windows-x86_64_(minimal|$toolchain)"
$assets | Select-Object name, size
2. Download both through the asset API, a different endpoint from the one that times out:
$headers = @{ Accept = 'application/octet-stream' }
foreach ($a in $assets) {
    Invoke-WebRequest "$api/assets/$($a.id)" -Headers $headers -OutFile "$env:TEMP\$($a.name)"
}
3. Check both downloads against the release's sha256.sum before unpacking anything. That small file came through the normal download URL for me, even while the large archives were timing out:
Invoke-WebRequest "https://github.com/zephyrproject-rtos/sdk-ng/releases/download/v$ver/sha256.sum" -OutFile "$env:TEMP\sha256.sum"
foreach ($a in $assets) {
    $hash = (Get-FileHash "$env:TEMP\$($a.name)" -Algorithm SHA256).Hash
    $ok = Select-String -Path "$env:TEMP\sha256.sum" -Pattern "$hash\s+$([regex]::Escape($a.name))"
    "{0}  {1}" -f $(if ($ok) { 'OK    ' } else { 'FAILED' }), $a.name
}
Both lines must say OK. If one says FAILED, delete that file and download it again.
4. Unpack the bundle into your home folder, and the toolchain into the SDK's gnu\ folder, which is where the setup script keeps toolchains:
$sdk = "$env:USERPROFILE\zephyr-sdk-$ver"
7z x -o"$env:USERPROFILE" "$env:TEMP\zephyr-sdk-${ver}_windows-x86_64_minimal.7z"
7z x -o"$sdk\gnu" "$env:TEMP\toolchain_gnu_windows-x86_64_$toolchain.7z"
5. Register the SDK with CMake by running the setup script that came in the bundle. Because the toolchain folder already exists, it skips its own download and only registers:
& "$sdk\setup.cmd" /t $toolchain /c
Its other options are /t all for every GNU toolchain, /l for the LLVM toolchain and /h for the host tools. From here on, builds find the SDK exactly as if west sdk install had done the work.
Step 5: A first build
With a board, build blinky and flash it. west boards lists every board name Zephyr knows; the nRF52840 DK from part 2 is nrf52840dk/nrf52840.
cd ~\zephyrproject\zephyr
west build -p always -b <your-board-name> samples\basic\blinky
west flash
-p always starts from a clean build folder every time, which avoids stale files while you experiment. west flash may need an extra tool for your board's debug probe, and it prints an error if one is missing.
No board yet? Build anyway. A build does not need the hardware, and a clean build proves that Python, CMake, Ninja and the SDK work together. Pick an emulated board that matches your toolchain, qemu_cortex_m3 for Arm or qemu_riscv32 for RISC-V:
west build -p always -b qemu_riscv32 samples\hello_world
The end of the output on my PC:
[124/124] Linking C executable zephyr\zephyr.elf
Memory region         Used Size  Region Size  %age Used
             RAM:       28848 B       256 MB      0.01%
        IDT_LIST:           0 B         4 KB      0.00%
Generating files from …/zephyr/zephyr.elf for board: qemu_riscv32/qemu_virt_riscv32
zephyr.elf is the finished image, and the table shows how much of each memory region it uses. Earlier in the output, my build also printed Could NOT find Dtc, because dtc is not on my PC's PATH. The build still works, since Zephyr only runs dtc for extra devicetree warnings, but with the winget line from step 1 you should not see that message.
Every new terminal
The virtual environment is only active in the terminal where you activated it. Start every new terminal with:
~\zephyrproject\.venv\Scripts\Activate.ps1
cd ~\zephyrproject\zephyr
What's next
Part 4 brings in real hardware: an ESP32-P4 board that Zephyr does not officially support yet, and what it takes to bring Zephyr up on it.
Resources
Zephyr Getting Started Guide: docs.zephyrproject.org/latest/develop/getting_started
west, Zephyr's meta-tool: docs.zephyrproject.org/latest/develop/west
Zephyr SDK releases: github.com/zephyrproject-rtos/sdk-ng/releases
Found a mistake or something unclear? Let me know in the comments below, and I will correct the post.
Bình luận
Chưa có bình luận nào. Nếu bài này sai ở đâu, nói giúp.